Showing posts with label Drawing tutorial. Show all posts

Drawing Tutorial 010 - Drawing female figure(part 2)


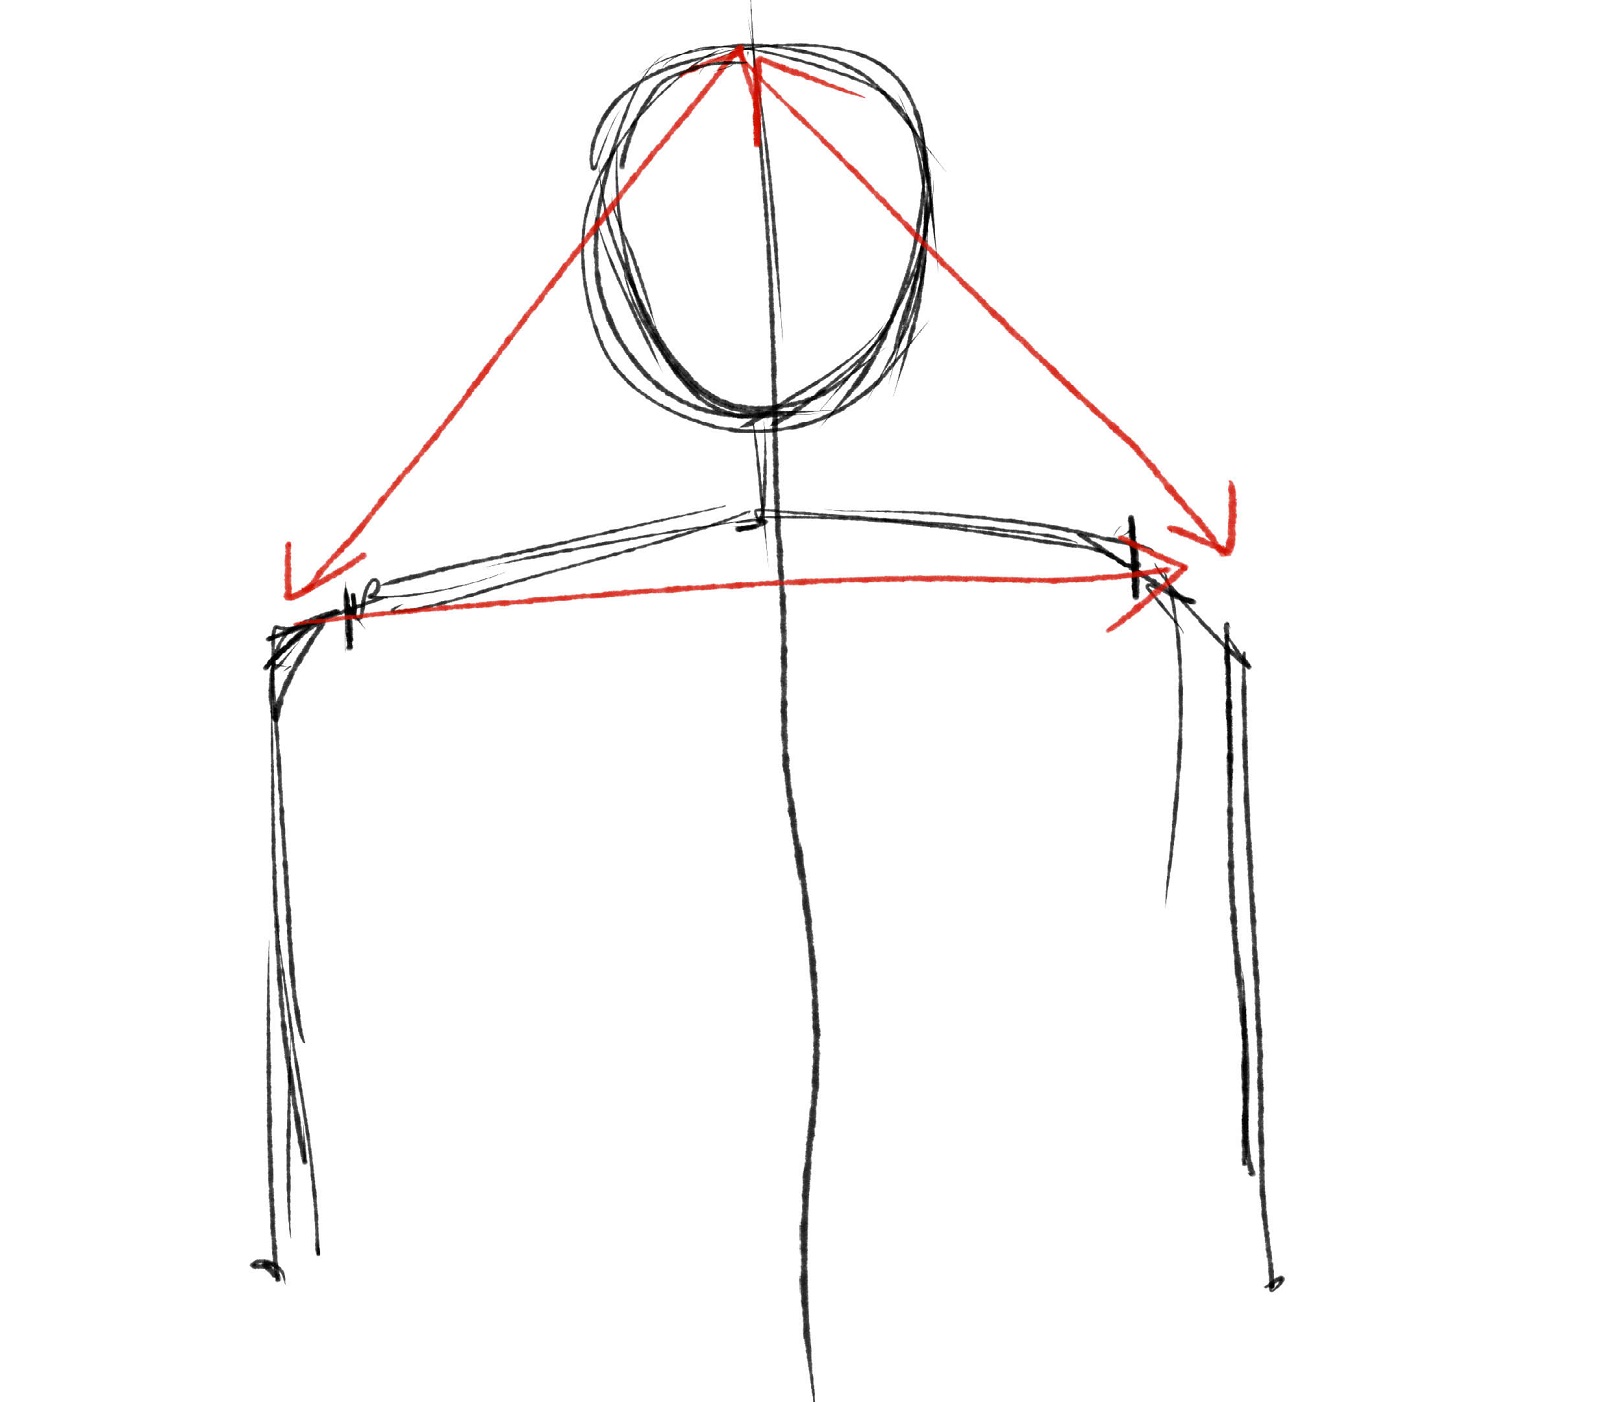
This week we will go little further into drawing a female figure. Last week we drew the figure upto chest, this week we will see the proportions and shapes upto the hip/crotch.

Full human figure is generally 7 and 1/2 head tall, that way it is easy to demonstrate the relationship between the head shape/size and the whole figure. While facing straight, the head height is considered as from top of head to chin.

For drawing figures within permissible proportions, some more guidelines are used. The whole height is broken as below.

From top of head
Chin - 1 head
Nipple- Little below 2 head
Waist/Elbow - Little above 3 head
Naval - little below 3 head
crotch- little below 4 head

Drawing Tutorial 008 - Drawing materials


This week we will discuss about the drawing materials required for graphite pencil drawings-

Let's see first the essential ones

1) Paper
Its the surface mostly used to draw with graphite pencil. The papers that are used for drawing with graphite can be differentiated on the basis of how much teeth the paper has. More the teeth, less smooth the paper will be. While a paper with medium to high teeth is good to sketch on. for finer drawings a smoother paper will do the job better. While doing free sketches I use all kind of papers that takes graphite well like notebook, sketchbooks, print papers. Print papers have very less tooth and is good if the intended sketch is more towards line drawing. I fine the desk notebooks that are used in meetings and conferences a good option to draw rough sketches to free the drawing muscles. 

However, when the drawing is intended to be a finished drawing that should last long, a completely different property of the paper comes into play. Its the acidity of the paper. For longevity of the paper, it should be acid free, else it would turn yellowish over time and become brittle. All general purpose notebook available from Indian manufacturers are not acid free and therefore prone to deterioration. Thus, if the drawing is meant to be preserved over time, archival grade paper is the best option.

Drawing Tutorial 007 - Drawing a face looking up


Last week we have drawn a face looking down. Today we will draw a face looking up. The basis of the face as we have learnt in previous weeks lessons, is an oval tapering to the bottom. The final result we will be aiming is 


Drawing Tutorial 005 - Drawing male face in front view


1. The basic oval of the face in front view remains same. Mark the horizontal eyeline and vertical divider. Mark the position of the nose, mouth and position of eyes. The eyebrows in case of a male is generally little thicker and straighter than that of female.

Drawing Tutorial 004 - Drawing a female head / face in front view

1. Lets start with the oval. We are going to draw the female face straight looking at us, therefore we start with drawing the oval which is symmetrical to the horizontal axis. We mark the eyeline dividing the oval in equal halves because we are drawing a face that is straight looking at us. Similarly mark the position of eye, nose and mouth. Keep the guidelines light to be easily erasable later on.
 See earlier tutorial - drawing a head in frontview.

Drawing Tutorial 003 - Drawing a head in profile view

1. We start with the oval shape, this time the oval is not symmetrical to its horizontal axis but little tilted to the right (we are drawing a face in profile, nose being on our left). Also the forehead area is little bulging compared to a symmetric oval. As the face is looking horizontally the eye line is straight and cuts through middle of the oval. Position of ear can be marked by drawing a vertical line from top of the oval.

Drawing Tutorial 002 - Drawing a head / face in front view

1. We start with the basic oval shape. The oval tapers to the bottom. For head facing straight to the observer, its symmetrical to the vertical line dividing the face in two halves. The horizontal eye line is approximately in the middle of the oval. In this one the eye line is drawn a little above the middle. The top of the year is aligned with the eyeline. Since face is viewed from the front, ears will be narrower than while the head is seen in profile. Tip of nose is halfway down from the eye line to the bottom of jaw.

Drawing Tutorial 001 - Drawing a head in three quarter

1. Lets start with the basic shape. An oval. For three quarter view the center line shall be in one side and curving along with the edge of the oval. The eye line shall also be a curve. Here the eye line is curving up suggesting the face is tilted downward a little.