last few weeks we have drawn some figures and before that we have learn to draw male and female heads. We will now see how to draw the facial elements like eyes, nose, mouth and ears in more details. This week we will draw eyes.
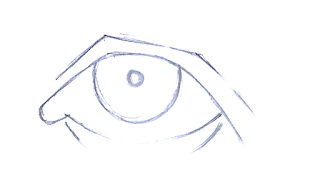
1. The basic shape of eye as we may have drawn is that of a convex lens.
We will stick to that shape, but start with straight lines. That's because drawing with straight lines and remembering the shape is much easier. Its something like a hexagon with height half its length. A little rectangle is added to its left for eye's inner canthus. See what is canthus here .
The iris is round. but in normal cases, top of iris is hidden below upper eyelid. The lower edge touches the lower eyelid(Here we are leaving a a gap).
2. The upper and lower lid of the eye creates crease in both above and below the eye.
3. Now that we have drawn the basic shape lets move to shading and fine tuning. The iris is dark (dark brown, black or hazel even blue) while eyeball is off white. Pupil is black and if light reflection is not considered it will be black.
Now that we have drawn the basic shape lets proceed to add tone (what is tone? see it here) to the line drawing to create a bit of realism. To start shading, we need to know a few things:
a) The source of light - In general the surfaces that gets direct light are lighter in tonal value and areas getting less light shall be dark and the areas that are getting direct light at all shall be darker. But one tricky point to note is that the side facing the direct light do not have same tonal value. The spot that reflects the light towards the observer is lightest, even white in some cases. A single light source shall cast sharper shadow in comparison to a location that have ambient diffused light.
b) Surface of the object - Light reflects differently from different surfaces. A smooth surface like polished metal, a marble floor glossy paper reflects most of light and shines. The shine is rendered by drawing vary light or white area and with contrasting darker shades. In contrast a matte surface scatters light a bit and therefore the the shine is less. Also, the contrast between lighter and darker tone is also less. In other words there is gradual transition from soft to dark tone.
3) shape of the object - An object that has sharp changes in shape like a box shall have sharp contrast of light and dark. But when the face of surface changes smoothly like in a spherical object, the change in tonal value is also gradual.
To sum up - if light is reflected back to observer(towards the frame of the drawing), then it should be rendered lightly. Be it a black hair or be it a water surface.
We will consider that light source is over the observers right shoulder. observer's eyes' imaginary cross-hair is shown in blue. The red quadrilateral is the larger area that reflects light while yellow shows the highlight(kind of total reflection).
5) We add more shadows to the sides of the eyeball (corners where the eyelids meet). Though the light comes from right side, eyeball being round, the extreme right part will reflect light BUT NOT towards the observer. Therefore this area is bit dark. Note that eyeball is off-white and little less light wont make it too dark.
6) The iris is black (in our case. Iris colour vary). So lets render it dark! But wait. We learnt above that even black when reflects light completely should be rendered lightly. So the marked area is kept light.
Now the iris is not a black box. It has interesting texture which when simplified looks like radial thin spokes.
7) Lets now add the highlight by erasing the area we earlier marked with red. Finally we add the eyelashes. And we are done.


No comments:
Post a Comment